At one point in my life I considered being a furniture maker. I had the woodworking bug. I read books and magazines on the subject. I built really, really bad tables with drawers that didn’t work quite right — all of the things we do when we first start a new endeavor, we screw up. After a close call between my finger and a table saw I rethought things. I’m fine with that. But I still really like good furniture. Having tried to do this myself, I have a great respect for those who do it well. Over the years I’ve had several furniture clients, some of whom make great stuff, others not so much. The clients who make great furniture are still around. (more…)
Many wedding and Bar Mitzvah photographers find themselves in a bit of a pickle when they are first starting out. You’ve looked at hundreds of websites and seen all these incredible, artistic wedding pictures and decided “I want to do that.” So, you buy all the equipment, flashes and fast lenses that you can afford and set out to create beautiful, moving images. You spend all this time and energy in pursuit of the artistic and then suddenly discover that you can’t shoot the mundane … and let me tell you, there is a lot of mundane to shoot at a 7-hour wedding.
It’s not our fault that we don’t always learn how to take these shots. They aren’t the sort of shots that get featured on the web or in the pages of a magazine. It’s great to see those beautiful shots of an outdoor wedding and the incredible formals but what about the other 500 pictures the photographer took? You know, the ones in the dark hall with the dancing people? You don’t see many of those on the ol’ website because they aren’t quite as dynamic. Still, being able to take a good table shot or dancing shot is every bit as important as the perfectly lit formal. For some clients it may be more important, depending on who is sitting at the table or dancing on the floor.
My first rule of photography is this: Get the shot. First, learn how to get the shot, any shot, in any situation. Then, learn how to get it in an artistic and creative way (if needed). Don’t spend so much time learning the “hard” shots that you neglect to learn the “easy” ones. You may find that the “easy” ones aren’t so easy after all.
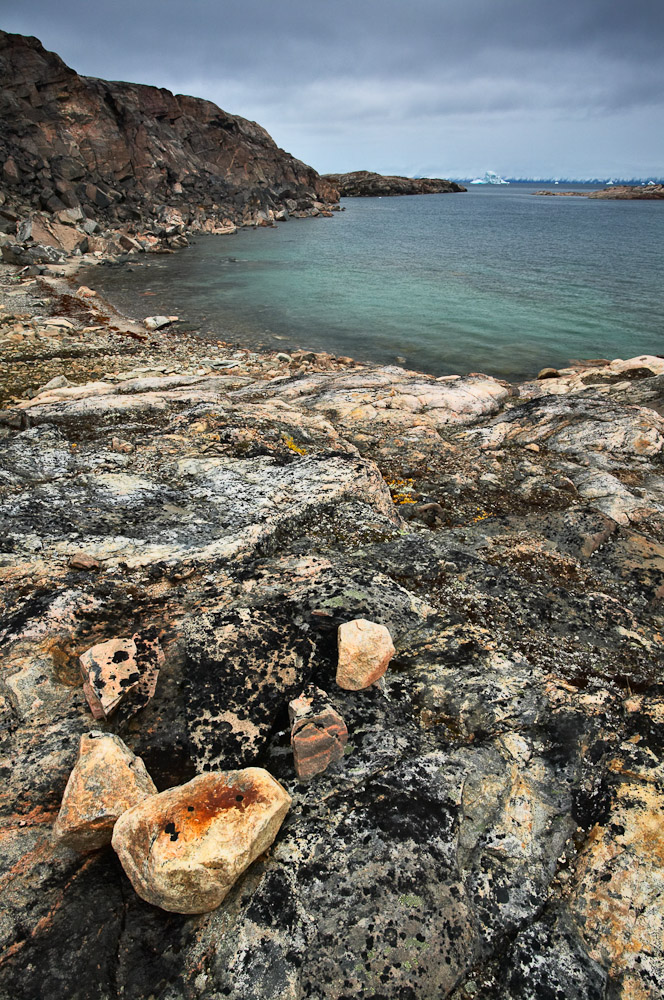
Traces of the Ancient Thule, Danmark Ø, Scoresbysund, East Greenland. I wanted more texture in the foreground, front-lighting and soft light from clouds kept the rocks from being visible. I couldn't move to the side, because I wanted to include the bay behind. I couldn't come back because of the constraints of getting to this location in Greenland. My only option for introducing texture and depth into the foreground rocks was adding some fill flash, which I did with the help of a reflector.
If you like this article, you can now get the book! Joe has expanded the “Tuesday Composition” series into an inspiring new ebook on composition, especially for nature photography. Check it out: The Tuesday Composition.
A few years back, Frans Lanting said something in passing that’s really stuck with me, I presume it’s an old studio lighting maxim:
Front-lighting for color, side-lighting for texture, back-lighting for form.
This line is pretty much a recipe for how to light an object in the studio depending on what aspect of it you want to emphasize. Got a colorful subject? Start by photographing from the same direction as the light is coming from. Want texture? Make sure the light is coming in from the side, that way it’ll be raking across the front of the subject you’re looking at and showing shadows on even the smallest bits of texture. And want to show the shape of something? Backlight it, and create a silhouette.
Obviously it’s simplistic (as any nine words of advice must be), but it’s not a bad place to start when thinking about lighting.
In addition to light direction, we also talk about the difference between soft (wide) light sources and hard (tiny) light sources. Hard lighting tends to pick up more texture by creating better-defined shadows than soft lighting.
What does all of this have to do with composition?
While we have a great deal of flexibility in lighting subjects in the studio, many of us who photograph nature, or events, or sports often have a little less room to organize our environment the way we’d like. We might have a couple different objects in our scene, and perhaps we’d like the form of one of them juxtaposed with the color of another and the texture of a third, and the light might be doing something else entirely. (more…)
I have started macro nature photography using a new Nikon 85 mm f/3.5G VR Macro lens on my Nikon D90 camera. What is best in terms of lighting? Should I use a shoe-mounted flash unit with a downward tilt, or a ring flash, or a bracket with two arms, each holding a separate flash unit? H. H.
Answer
In my experience, on-camera flash is not suitable for extreme close-up photography. The flash may not be able to light the bottom part of the subject in extreme close-focus image making. That’s because it does not allow for an adequate downward tilt and the lens barrel may block some of the light. If you do want to use a conventional flash unit, move it off-camera using a TTL extension cable or Wireless Off Camera Flash (if your camera supports the latter.) For softer lighting add a large diffuser accessory such as the Lumiquest Softbox III. (See this item at B&H ; See this item at Amazon Lumiquest The Softbox III – Lumiquest LQ-119)
The latest macro ring lights – such as the Metz 15 MS-1 that I recently tested – are very versatile and easy to use. They typically consist of a circular mechanism that’s mounted on the front of a macro lens with an adapter ring. The “ring” – with two individual flash tubes – can be rotated so you can place the two light sources at the desired position. The Metz kit (and some others) also includes a diffuser accessory that’s useful in extremely close focus work. (See the Metz unit at B&H; see this item at Amazon Metz MZ 15110 Digital Macro Slave (Black)) (more…)
As a photography student I was encouraged, and in many cases assigned, to many different types of photography. We were given individual assignments on portraits, still life, products, journalism, industrial, architecture, etc. As I progressed through school, individual assignments gave way to elective courses specific to certain types of photography. Of course learning the technical and aesthetic challenges associated with different types of photography is important to any well rounded education, but more important was the ability to learn about yourself and what types of work you are best suited to. It was during these years that I discovered I really enjoy the slow, methodical processes of studio work and as a natural extension of that I gravitated towards food photography. (more…)