Q and A: Raw capture mode is confusing. Can you help?

Question

I need some advice about using RAW capture mode. I have just started shooting in RAW mode but after some research on the Internet, I still have some questions about RAW. Why won’t Photoshop CS3 or Elements 7 open and convert the RAW files from my EOS T1i? Also, when using the Canon DPP software, should I save the photos to an 8-bit Tif or a 16-bit Tif. L.V.

Answer

The software that’s bundled with any DSLR certainly supports the unique RAW format produced by that camera. However, versions of Photoshop that are older than CS4 – such as CS3 – do not support the newer cameras’ formats.

That’s because Adobe ceased supporting the older versions. Both Elements 6 and 7 do support the RAW files produced by most of the recent cameras, including the T1i. Anyone who cannot open a RAW file with Elements 6 or 7 will need to download and install the Adobe Camera Raw plug-in version 5.5. See Adobe for the download and for installation instructions. (Photoshop CS4 owners should note that they may also need version 5.5 or later.)
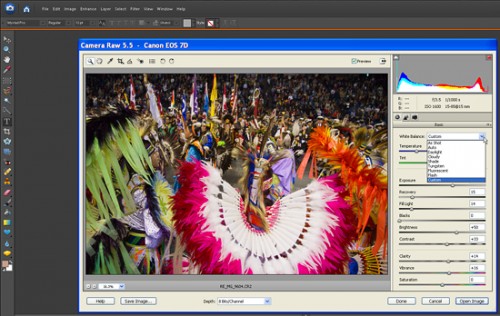
All versions of Photoshop Elements - since version 6 - can support all of the latest DSLRs' RAW formats. Of course, with newer cameras, that may require installing the latest version of the Adobe Camera Raw plug-in.  ©2009 Peter K. Burian
All versions of Photoshop Elements - since version 6 - can support all of the latest DSLRs' RAW formats. Of course, with newer cameras, that may require installing the latest version of the Adobe Camera Raw plug-in. ©2009 Peter K. Burian

The default with any RAW converter is 8-bit per channel color depth when converting to the TIFF format from a RAW file. Most converter programs also allow you to select 16-bit TIFF. (more…)
Continue Reading

A simple cheat to direct a viewer’s eye

We can’t always control the shoot as much as we’d like. One of my regular gigs is shooting real food prepared by real kitchen staff at real restaurants. The shots are more about the cooks and the restaurants than about my photographic prowess. Many times food comes out of the kitchen looking perfect, other times … not so much.  On these assignments I’m also usually restricted to available light, or minimal supplemental lighting. Immediately I’ve lost control over two key aspects of the shot. It’s on assignments like these that I’ll often employ a trick that’s so simple I’m almost   embarrassed–vignetting.

By artificially darkening the corners and edges of images we can direct the viewer’s eye toward the center. The trick is to not overdo it, but to have it be subtle. If you look at an image and think, ‘Oh, darkened corners,’ you’ve most likely gone too far. There are several points along the way where you can employ this trick, but my preference is in Photoshop, after the image has been cropped and the contrast adjusted.

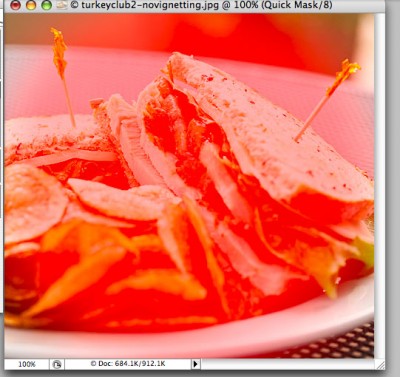
My personal method involved the Quickmask tool and an Adjustment layer. On you image, enter Quickmask mode (Q key command) and select a round paint brush of appropriate size. Then simply mask the majority of the image. Remember this is a mask, not a selection, so the areas you paint will not be affected by the next step.

Quickmask mode
Quickmask mode

(more…)

Continue Reading

I have Lightroom, do I need Photoshop?

Mist and Snow, Cummings Creek Wilderness.  One of multiple flaws in this image is the convergence of the tree trunks, they're slightly closer together at top than bottom.  This could be easily corrected in Photoshop, not so easily in Lightroom alone.
Mist and Snow, Cummings Creek Wilderness. One of the multiple flaws in this image is the convergence of the tree trunks; they're slightly closer together at top than bottom. This could be easily corrected in Photoshop, not so easily in Lightroom alone.

One of the most common questions I get when teaching my Adobe Lightroom workshops, is whether Lightroom is enough. The answer to that question depends on your needs and goals. But it is worth spending a bit of time reviewing reasons a photographer who has Lightroom 2 might also want to invest in Photoshop:

  • Graphic Design: If you are authoring your own web site or other publications, you may want Photoshop (or other tools) for laying out text over images, and so on.
  • Healing Tool Differences: There are some really nice things Lightroom can do that Photoshop can’t (like synchronizing correction spots on identical compositions), but Lightroom’s spot removal tool works best on small spots. Photoshop’s healing brush seems a more powerful option for larger scale healing, such as removing linear defects like branches or cracks in scanned images. (more…)

Continue Reading

Where’d My Saturation Go? Understanding JPEG Export Woes

Photoshop, LAB, no embedded profile

Many times I’ve heard the understandable complaint that, after a good bit of working an image to get just the right color, that those colors are sapped by Photoshop or Lightroom when the image is exported to JPEG and then viewed on the web. There are all sorts of explanations on the web about this, and a lot of posturing about the “right way to handle things,” and there are all sorts of issues with the wealth of uncalibrated monitors out there, web browsers that don’t support color management at all (IE, Chrome, older Firefox) vs. those that do support it (Safari, more recent Firefox).

I figured it was time to do some testing. (more…)

Continue Reading

Spec’ing a Lightroom desktop for performance and budget

In the past month or two I became aware of how I was losing a lot of time and personal sanity editing images on my primary work desktop, the performance of Adobe Photoshop Lightroom 2.3 on my old system was both poor and erratic, so I’m replacing it. In this article I’ll share with you my limited investigations into Lightroom performance and configuring a Lightroom-centric photography computer on a budget. (more…)

Continue Reading
  • 1
  • 2
Close Menu