(and other large products)
At one point in my life I considered being a furniture maker. I had the woodworking bug. I read books and magazines on the subject. I built really, really bad tables with drawers that didn’t work quite right — all of the things we do when we first start a new endeavor, we screw up. After a close call between my finger and a table saw I rethought things. I’m fine with that. But I still really like good furniture. Having tried to do this myself, I have a great respect for those who do it well. Over the years I’ve had several furniture clients, some of whom make great stuff, others not so much. The clients who make great furniture are still around.
Shooting furniture takes a lot of time and patience and a LOT of space. In general, you need three times the width of a piece on either side to properly light. In other words, if you have a piece that is four feet wide, you should have at least twelve feet of space on each side. As always, when it comes to space, more is better. Also, you need to be able to tightly control your light. This means artificial light (I use studio strobes) with light modifiers such as grids, snoots, barndoors and occasionally softboxes.
Most furniture comes in three varieties, lacquered, painted or upholstered. In general, painted and upholstered furniture is a bit easier to shoot than lacquered since the reflectivity is usually lower. Specular highlights and glare are much less of a problem with painted or upholstered pieces. With painted and upholstered furniture, broad light sources often work well (softboxes, umbrellas, heads bounced off of ceilings, also cloudy daylight). Lacquered furniture is much tougher. Generally we want to see the wood grain clearly through the stain, but we also want to get a sense of the type of lacquer and finish. Is it glossy (like a French polish,) flat (tung oil,) or somewhere in between? It’s this balance between seeing the sheen of the surface and the color and grain beneath that presents a big challenge.
I treat all of the furniture I shoot as architectural pieces. In other words, I make sure that the lines that are supposed to be straight are straight, level and plumb. This means either using shift lenses (or large format) or being able to fix it in post. Keeping things square and level is a big deal in the furniture making world, don’t screw it up by not having your camera level. In general, I use the longest lens that I can as determined by the space and the piece to be shot. Longer lenses don’t exaggerate perspective the way shorter ones can.
I approach lighting large products, such as furniture, as an exercise in surfaces. Generally, each piece will have three surfaces facing the camera — front, top, side. Each surface will have different needs for lighting and therefore, each gets it’s own lighting setup. Sometimes this can be done all at once, other times it requires using multiple exposures.

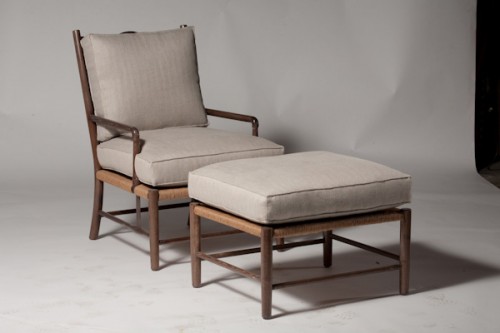
First image shows the placement of the first light, in this case a 4 foot softbox to camera left and at about 10 feet high. This provides the primary light for the side of the chair/ottoman as well as overall soft fill.

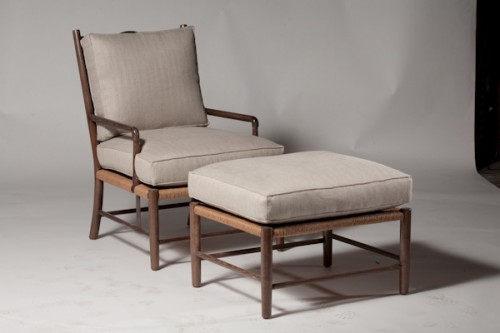
The next image shows the placement of a grid spot raking the front of the ottoman. This light, placed at about 2 feet high really brings out the texture in the rush weaving under the cushion. This light is also flagged off as to not spill too heavily on the cushion itself.

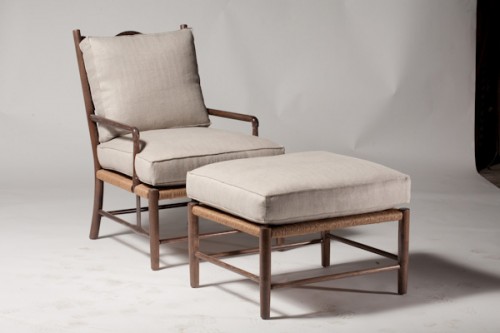
Third image shows the placement of a front fill to even out some of the shadows. It also provides a highlight along the lower rails of the ottoman. This light is placed camera right. We’re using a 7-inch reflector shooting through a 3×6 light panel.

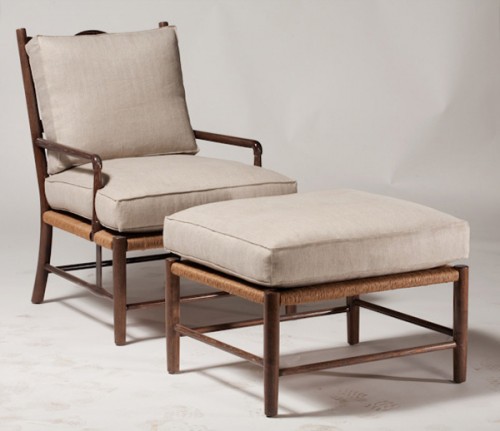
Final image as delivered to client shows minor tweaking of light output and a small bump in contrast. The client will put a clipping path on this for inclusion in their product catalog.
Shooting furniture is a lot like my other passion, shooting food. It’s technical, slow, methodical, and the subjects don’t get an attitude. It’s a challenge to be sure. The clients I work for spend a lot of time and money developing these products so they need to make sure they show them in their best light. I realize that not everyone has access to the space and equipment I describe here. But there are a number of inexpensive options to studio strobes. A number of third party manufacturers make a wide range of light modifiers for flashguns, but you’ll give up some power and versatility using these systems, as opposed to studio strobes.
But more important than space or gear is time. Take it, go slow, look carefully at the product and the shots. I know that if I knock one of these out in 20 minutes, I’m forgetting something.
kn smith
19 Oct 2010Thanks for this information but could you tell me the lens that you use I have a canon 450D
regards ken
Aref Adamali
31 Jan 2011Great post. Careful and clear. I manufacture furniture inK, and am going to try to reshoot the whole lot for a new web site. I have been reading a lot online to pick up tips, and found your posting to be one of the most useful, despite not being very long. Thanks.
Jac C
16 Oct 2012Clear article, great. What sort of wattage does your lighting give out? I have just shot my second batch of furniture and found that natural light still did the trick, however for web presentation (online stores) I have to etch everything out for clients and am now investing in a backdrop kit with lights. Most kits on ebay appear to be low wattage. e.g. Soft Box with 4x45w in each. Thanks.
Ryan
14 Jan 2017Hi there,
A friend has asked me photograph high end bespoke furniture for him. It is at a furniture show in a convention centre display on a makeshift showroom floor.. There is no natural lighting, it is all artificial. He just wants good photos detailing the furniture but not catalogue or plain back drop style.
Ive never done this style of photography before, have you got any advice. Cheers