When you’re building a WordPress photography site, it’s important to fine-tune your image displays for visitors. However, before they can enjoy your galleries, they have to be able to find and navigate your website with ease. This is one of the many reasons image optimization is so crucial.
Fortunately, techniques such as deep linking can help improve the navigation of your site and, more specifically, your galleries. This strategy also makes your photography site more user-friendly.
In this post, we’ll explain the concept of deep linking and its benefits. Then we’ll provide you with three steps for using it on your photography site. Let’s get started!
What Is Deep Linking and Why Is It Important to Photography Sites?
Deep linking is the practice of creating unique URLs for internal pages or elements on your website. It’s a common technique that is sometimes used to improve navigation when directing others to your site.
For example, a deep link on your photography website could look something like http://yoursitedomain.com/page/. This is a specific URL that differentiates the content from your homepage.
However, you can also use deep linking to point to specific images in your galleries. For example, such a URL might look something like http://yoursitedomain.com/gallery/photo.
There are many benefits to using this practice on your photography website. Primarily, it facilitates a photography site filled with galleries that are not only easier to navigate, but easier to share as well.
Individual URLs for each of your images can simplify the process of sharing them with clients and potential leads. Let’s say you want to refer a client to a specific image in one of the galleries on your WordPress site. Instead of making them click through the photos until they find the right one, you can share the unique address for the relevant piece.
How to Use Deep Linking on Your WordPress Photography Site (In 3 Steps)
Unfortunately, you can’t create gallery deep links to your images with WordPress alone. However, you can incorporate them with help from a plugin. Let’s take a look at how you can implement this technique on your photography site in three simple steps.
Step 1: Install the NextGEN Gallery and NextGEN Pro Plugins
NextGEN Gallery is the most popular WordPress photography plugin. It’s free and lets you add a variety of image gallery and album displays to your site:

You’ll need it to use NextGEN Pro, which is the premium version of the plugin that comes with a built-in deep linking feature. After you install and activate NextGEN Gallery, you can upgrade from your WordPress dashboard by clicking on Gallery > Upgrade to Pro in your sidebar.
After you download the .zip file for NextGEN Pro, you can upload it to your WordPress site by going to Plugins > Add New > Upload Plugin. Once you’ve activated it, you’ll see a new Ecommerce link in your dashboard sidebar.
If you’re a Photocrati Pro customer, then you’ll be happy to know your theme comes with NextGEN Pro!
Step 2: Turn on the Pro Lightbox Effect
One of the premium displays that’s included with this plugin is the Pro Lightbox. In addition to showcasing your photos in large, easy to see pop-up windows, this feature enables image commenting, social sharing, and the deep linking gallery setting.
To enable deep linking, simply navigate to Gallery > Other Options > Lightbox Effects in your WordPress dashboard:
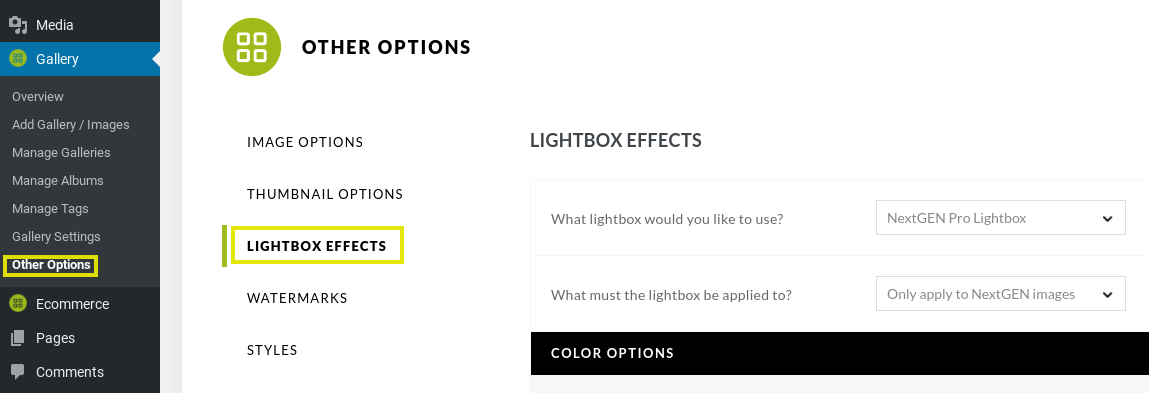 Other Options > Lightbox Effects in your WordPress dashboard:” width=”1149″ height=”393″>
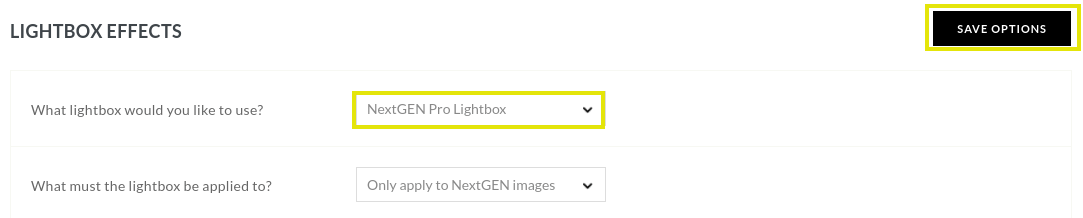
Under the section heading What lightbox would you like to use? there will be a dropdown menu. Select NextGEN Pro Lightbox. Then click on the Save Options button in the top right corner:
Once the Pro Lightbox effect is enabled, visitors will be able to open this display by clicking on any image in one of your galleries.
Step 3: Test to Make Sure the Deep Linking Feature Is Working
If you have the NextGEN Pro Lightbox and deep linking enabled, the unique URLs for each of your images will be created automatically. To test it, you can visit the front end of your photography site.
Navigate to one of your galleries and open the lightbox display. You will be able to see each image’s deep link in the address bar of your browser. If it’s working correctly, you will notice that the URL changes slightly for each photo as you click through them.
Conclusion
Optimizing any WordPress site for optimal usability can be a tedious task. However, this is particularly true when it comes to image-heavy photography websites. The good news is that there are techniques you can use to significantly enhance the User Experience (UX) and navigation of your site, including deep linking your photo galleries.
As we discussed in this article, you can deep link images in your galleries by following three simple steps:
- Install the NextGEN Gallery and NextGEN Pro plugins.
- Turn on the Pro Lightbox effect.
- Test to make sure the deep linking feature is working.
Do you have any questions about deep linking for your photography site? Let us know in the comments section below!

Paul
4 May 2020Thank you for this article during the lockdown I have been working on my personal photography website. I am currently using the themes gallery and lightbox not sure if that is deep linking or not.
Scott
5 May 2020Typically a theme’s lightbox won’t offer deep linking. Ours included a premium plugin we make called NextGEN Pro, which does offer deep linking.