Digital photography has brought about a whole new way of experimenting with your images. If you really want to test your creative juices you have to try shooting on a green screen. This technique is the same one used in Hollywood and featured in most of today’s blockbuster movies and used daily on TV newscasts. Green screen, also known as chroma key is surprisingly easy and definitely fun. You’ll need a few items to get started. First you’ll need a piece of green material, which can be found in a number of places online, I found my 8 x 10 piece of fabric on eBay and paid under $40.00. You can check your local fabric store for green fabric but they tend to be more expensive at these stores. You will also need at least three strobe lights, small strobes will work but you will need a way to trigger all three strobes, either with radio slaves such as PocketWizards or photo slaves, or you can use natural light. (The key to green screen is an evenly lit background and minimal shadows hitting the background.) If you decide on using natural light then you will need a way to diffuse or soften that light such as bed sheets or my old favorite a white shower curtain. You will also need Photoshop. Finally you will need a background image to put behind your subject, such as another photo or graphic. In my case, I went with a 3D image. I use a package from e-on software called Vue, they are up to version 7, which I haven’t had time to upgrade to yet but will eventually. They offer different packages ranging from $199 and up. Vue has been used in major movie releases such as Pirates of the Caribbean, Indiana Jones and Australia.
Vue’s primary purpose is to generate 3D terrains and environments and is surprisingly easy to learn. A free trial version can be downloaded from their site e-onsoftware.com.
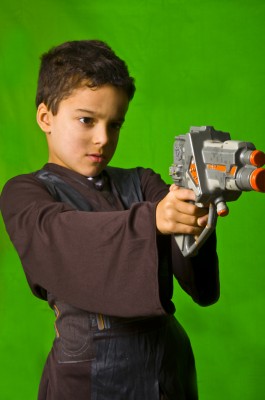
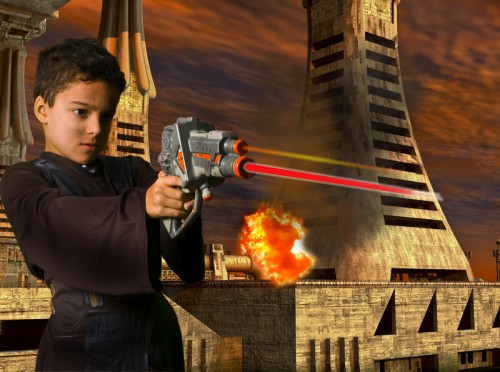
For this demonstration I am going to use a picture I took of my son in his Anakin Skywalker Halloween costume and a pre-built 3D city that was included with Vue.
I positioned my son in front of the green screen with a strobe in a soft box, camera left. 

2. Select Color Range from the Select menu.
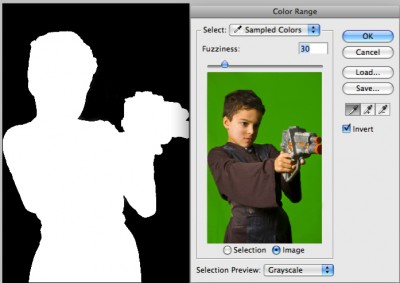
3. Once in the Color Range dialog box, click on the eyedropper tool, drag the Fuzziness slider to about 30, check the Invert checkbox, and choose Grayscale from the Selection Preview popup and make sure the Selection radio button is selected.
4. Using the eyedropper tool, click in the green area of the image, you can use either the main canvas or in the Color Range dialog. You’ll see much of the green area as white, and the rest of the image (which will be selected) black. If there are still areas (because of non-uniform lighting) of the green screen, which are not white, hold down the Shift key and click on them with the eyedropper until all of the green area is selected.
5. This selection should work pretty well, but if there are still pixels here and there that are white, you can lower the Fuzziness until it’s easier to click on the areas. Also, you can hold down the shift key and click and drag your mouse across an area to select many points at once, instead of clicking for each point. To select with even greater accuracy, you can zoom in by pressing ‘Command’ – ‘+’ (Mac) or ‘Control’ – ‘+’ (Windows).
6. Once you’re satisfied with your selection, click ‘OK’.
7. You should see the object selected. If there are any problem areas, such as scrolling ants in areas inside or outside your selection that shouldn’t be selected, hold down the Shift key as you use your eyedropper tool to select any stray areas.
7. Now you are ready to remove the green or blue screen. Make sure you’re working with the proper layer, and, if you are on the ‘Background’ layer, double-click it and click ‘OK’ to make it into a normal layer.
8. With your subjected now selected, click the Add Layer Mask button at the bottom of your layers panel, (the small box with the circle). Your background should have disappeared. Now add your background but make sure you place the background into a layer behind your current layer.
That’s it, you’re now a green screen expert!
