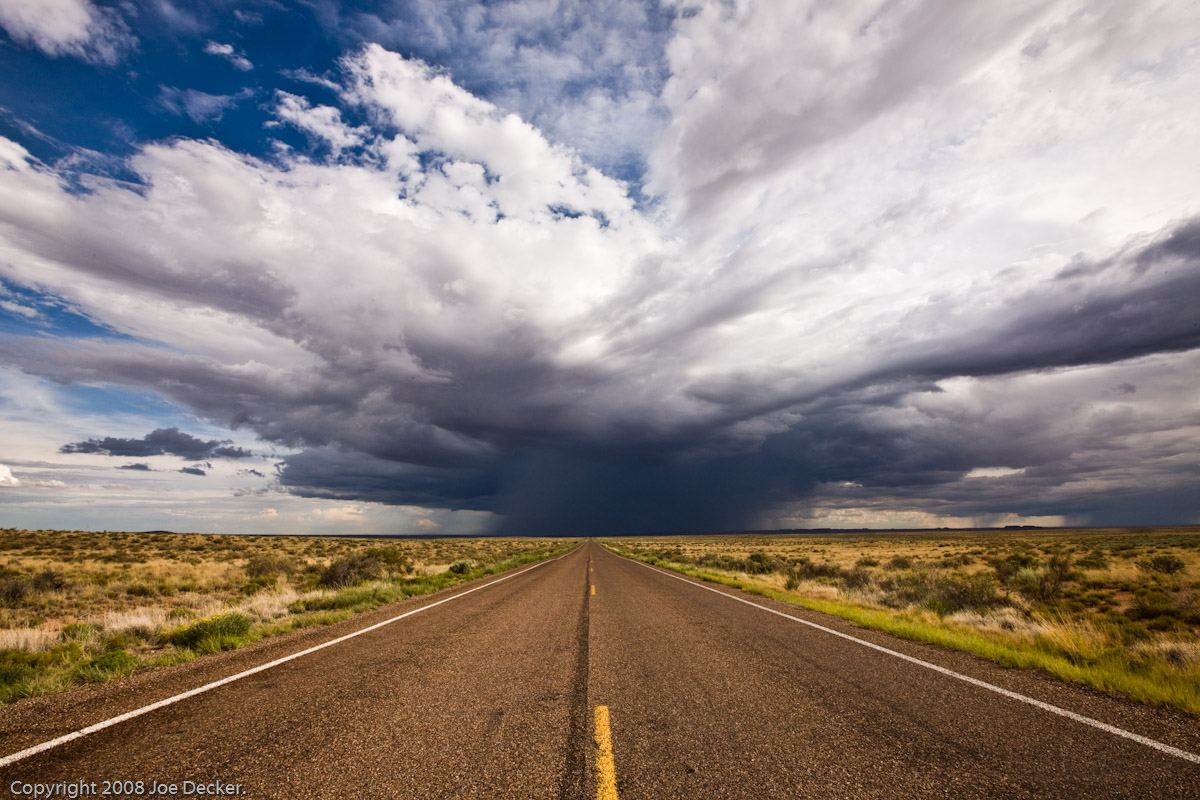
Distant Thunder, Petrified Forest National Park. (Image made during NPS artist residency at Petrified Forest.)
If you like this article, you can now get the book! Joe has expanded the “Tuesday Composition” series into an inspiring new ebook on composition, especially for nature photography. Check it out: The Tuesday Composition.
Last week I talked about S-curves, today I’m going to talk about the related and more general idea of leading lines. Leading lines are one or more lines in an image, typically diagonal lines usually coming up from around the bottom corners of an image. In particularly lines such as those formed by streams, railway tracks, roads, or geology along the ground. S-curves are a type of leading line, but here I’ll be contrasting them with lines that are typically straight or more simply curved.
Many of the things we said about S-curves apply equally well here, the lines seem to draw the viewer into the image, bottom towards the top. Similarly, I find that images that bring at least one of these lines from the lower-left are a bit more likely to work better for me, again probably related to the idea that the way we perceive images may be influenced in part by reading direction. (more…)
Last week I wrote a bit about the reasons tilt-shift lenses were becoming more popular in the DSLR world. This week I’d like to provide a simple example of using tilt in an image to increase effective depth-of-field, and offer a basic overview of how that’s done.
No tilt, shot at f/3.5.
Tilt dialed in, about three degrees. f/3.5. Focus is near the nearer of the two lens caps. If you look to the left of the table, you'll notice part of a cat tree, note that the upper parts of the cat tree are more in focus than the lower parts.
To demonstrate what a difference this can make, I ran a quick example with and without tilt using the older ::amazon(“B00009XVCD”,”Canon TS-E 24mm f/3.5L”)::. (To make the effect a little more apparent on these small screen samples I focused the image without tilt near the “near” lens cap. Of course, in that image I could have chosen to focus farther into the image–which would have blurred the near image somewhat to reduce the blurring in the far image, but both would have still been out of focus. Both images were taken at f/3.5 with a ::amazon(“B000V5LX00″,”Canon 1Ds Mark III.”):: (more…)
From reading reviews, I know that some recent DSLRs, like my Pentax K-7, include an Autofocus Adjustment function that allows for modifying the AF system for more accurate focus with certain lenses. Is this function necessary? If so, how does it work? R. Webber
Answer
Yes, an increasing number of high-end DSLRs of several brands include a feature of this type. It allows for instructing the camera to focus slightly more closely, or to a slightly greater distance, than it would do at default. This function would be useful for an older AF lens-especially one that has been banged around-if it is no longer focusing accurately. You may find that it focuses slightly ahead of the subject, or slightly behind it; these issues are called “front focus” and “back focus” and they call for AF Adjustment.
Before using this in-camera feature however, be absolutely certain of the lens’s exact focusing tendencies. (more…)
Last week I got a call from a company called Naneu
They make camera bags (they make quite a few camera bags in fact) and they asked me if I would field test one of them and give them some feedback. Well, there’s no way that I’m going to turn down a free bag so I jumped at the chance. (more…)
At f/2.0, the world of macro just got a bit faster.
Tamron SP AF60mm F/2.0 Macro. This APS-C macro is one stop faster than others in its class, and balances nicely when attached to the camera. Optically, it performed admirably. Courtesy of Tamron.
Any-and every-macro lens excites me with the challenge of portraying my subjects in intimate detail. So when I heard that Tamron introduced the SP AF60mm f/2.0 Di II LD 1:1 Macro, my heart truly started pounding. Normally, macro lenses in this focal length range start at f/2.8. So we’re talking about a macro lens that is a full stop faster.
Are you beginning to feel the adrenaline? Because this is an APS-C lens, that 60mm translates into a very respectable 96mm short telephoto on the Canon Rebel T1i that I used in my testing (soon to be available for Nikon and Sony). That short telephoto focal length gives me added breathing room between the lens and those tiny, often skittish critters I routinely confront.
Why We Need a Fast Macro Lens
Now, granted, most of us shoot our close-ups stopped-down. And it’s a given that depth of field is minimal when shooting at or near life-size. Still, depth of field does matter. We try to squeeze out every pixel of sharpness we can, especially when shooting handheld. The slightest hand tremor is enough to throw a subject out of focus.
You could add image stabilization to the lens and get around the worry over camera shake, at considerable added cost (provided it’s even available). And the benefit of this feature at or near life-size magnification is questionable. Besides, that addresses only one challenge. Outdoors, any breeze can make long arduous moments spent in fine-tuning focus on a delicate blossom a memory. Hence, you’ll often see me using a ring-flash attached to the front of the lens as a means of addressing practically any close-up challenge.
So where does a fast macro lens enter the picture? For one thing, not everyone likes to use flash or has a suitable flash in their camera bag. But there are even more important reasons. When shooting wide open (using selective focus), you surround the subject in a soft blur of color that many of us find pleasing. Or you want to throw distracting elements out of focus as much as possible and focus attention entirely on your subject-or one aspect of it. Combine that with exposing at a usable handheld shutter speed (preventing camera shake) when shooting under low light levels. And, last but not least, shooting wide open provides the added benefit of allowing shutter speeds that may be fast enough to prevent subject motion blur.
Of course, it’s all relative. You go with the flow, and tailor your approach, prioritizing depth of field and motion control-or both equally, as the situation and your artistic sensibilities demand. The fast macro lens gives you that added flexibility. (more…)
If you like this article, you can now get the book! Joe has expanded the “Tuesday Composition” series into an inspiring new ebook on composition, especially for nature photography. Check it out: The Tuesday Composition.
We’ve talked about how the eye tends to follow along edges–and we’ve also talked a fair bit about the different ways that direction affects how that plays into composition. Today, I’m going to put those two concepts together, and more, as I talk about the venerable S-curve.
An S-curve is simply a curve of some object, line or path in the image that curves back and forth horizontally as you proceed vertically, much like the letter S–in fact, usually exactly like the letter S. (more…)
We can’t always control the shoot as much as we’d like. One of my regular gigs is shooting real food prepared by real kitchen staff at real restaurants. The shots are more about the cooks and the restaurants than about my photographic prowess. Many times food comes out of the kitchen looking perfect, other times … not so much. On these assignments I’m also usually restricted to available light, or minimal supplemental lighting. Immediately I’ve lost control over two key aspects of the shot. It’s on assignments like these that I’ll often employ a trick that’s so simple I’m almost embarrassed–vignetting.
By artificially darkening the corners and edges of images we can direct the viewer’s eye toward the center. The trick is to not overdo it, but to have it be subtle. If you look at an image and think, ‘Oh, darkened corners,’ you’ve most likely gone too far. There are several points along the way where you can employ this trick, but my preference is in Photoshop, after the image has been cropped and the contrast adjusted.
My personal method involved the Quickmask tool and an Adjustment layer. On you image, enter Quickmask mode (Q key command) and select a round paint brush of appropriate size. Then simply mask the majority of the image. Remember this is a mask, not a selection, so the areas you paint will not be affected by the next step.
For many years, 35mm camera users have often been able to safely ignore the subject of camera movements. Not so for the large format folks, the relatively large film plane of a 4×5 view camera requires photographers to go to lengths even in the simplest images to get a deep depth-of-field, lengths that often include both camera movements and enormously tiny apertures (e.g., f/64). Our smaller film (or digital sensor) areas come along with a comparatively deeper depth of field. For better or worse, we may not wish to maintain our ignorance much longer.
If, like many photographers, you keep a close eye on gear announcements, you’ll have noticed the trend. While Canon had been selling three tilt-shift lenses for years, more recently they updated the 24mm tilt-shift with the ::amazon(“B001TDL2O0”,”Canon TS-E 24mm f/3.5L II “):: (greatly improving it’s optical quality) and added a ::amazon(“Canon TS-E 17mm f/4L”,”17mm”):: to the lineup. In the same time frame, Nikon announced and began to ship ::amazon(“B0013BEEUW”,”24mm”)::, ::amazon(“B001BTG3NW”,”45mm”):: and ::amazon(“B001BTAZHM”,”85mm”)::. What’s behind this new excitement? (more…)
I’ve decided that it’s time to start putting my foot down and really begin promoting my freelance business. As I wrote previously about life as a corporate photographer and being at the mercy of the bean counters I think it’s time to get this party started before the next round of layoffs appear over the horizon. I’ve been “freelancing” part time for almost thirty years, I’ve also been very fortunate in that I’ve always had a full-time job as a photographer in that time. Well as I get older I realize that the corporate gravy train could dry up at anytime and it would be nearly impossible for me to get another full time corporate gig, especially at my ripe old age of 47. That realization is why I made the decision to build up my freelance business now, while I can. (more…)
I remember when I started on my journey to become a photographer, I came across the phrase “lens compression” – but it wasn’t explained.
With an engineer’s background, I readily grasped such concepts as the field of view is wider for lenses that are shorter– because if you take a paper tube, and look through it, the longer the tube, the less field of view you can see at the end. Gotcha.
But I still couldn’t find a good example of this strange phenomenon that people kept talking about – lens compression.
Lens compression is what happens when you take a picture with a longer lens – it apparently compresses the foreground and the background, and makes stuff appear closer together than in real life. With wide-angle lenses, the opposite effect occurs.
For example, let’s take a look at two pictures: (more…)