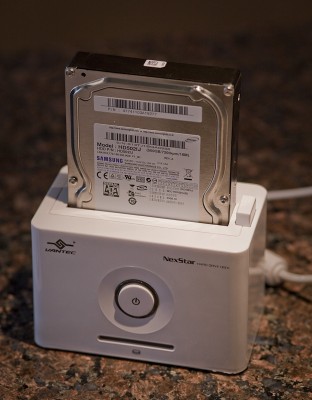
One of the most important aspects of any backup system is having a process, doing something consistently and uniformly enough that it’s easy to make sense of what’s going on, where information is, and so on. My backup process, while complete, has been a little ad hoc at times, and so as part of a move to simplify and organize my backup strategies I’m moving to keeping most of my backups on bare “internal” hard disks. While there are several ways of hooking bare drives externally to systems, recently I’ve become aware of a couple products that allow hard disks to be used almost like video game cartridges, plug in the drive, and go. Excited by the fact that this would simplify working with bare drives, I recently purchased the Vantec NexStar NST-D100SU 2.5-Inch/3.5-Inch SATA to USB 2.0 and eSATA Hard Drive Dock (White) and wanted to share my initial impressions and experiences with the product, which I’ll be calling “the Dock”, with apologies to my Apple readers.
The Dock connects your internal disk drive using either a USB or eSATA connection. NexStar provides not only USB and eSATA connectors but also a desktop bracket and cable that hooks to an internal SATA connector and provides an eSATA connector, as well as the obligatory power cables (each are actually labeled on the cable noting which type of cable it is, not entirely necessary but a nice touch for those of us who occasionally seem to generate cable nests). A simple instruction book is provided as well as a driver mini-CD/installation guide, while drivers are provided on the disk the disk should only be necessary for users of Windows 98/SE, or MacOS 8.6 or earlier, Windows ME/2K/XP/Vista, MacOS 9 (or later) and Linux 2.4.18 (or later) users should be able to plug and play according to their documentation. I tested the unit on an XP-based laptop via USB, and on a 64-bit Windows Vista system using eSATA. Vantec also makes a Vantec NexStar NST-D200SU 2.5-Inch/3.5-Inch SATA to USB 2.0/eSATA Dual Bay Hard Drive Dock (White) version of the Dock but I haven’t tested that myself.
The unit itself is small (see the photo) and light, and while it’s natural to equate “weight” with “build quality”, and the hard drive does sit a little more loosely in the “toaster slot” than I might have imagined, but the unit worked well and smoothly over my testing, and I have no reason to believe it won’t last a long time.
The 100GB or so laptop backup took around 5 hours, likely limited by USB bandwidth. After the backup, the hard drive itself was hot but not un-holdably hot to the touch, nothing surprising or alarming there.
In testing the Dock using eSata on my 64-bit Vista 64 desktop, I appear to have made the mistake of assuming that I could hot plug the device, apparently the ability to hot plug eSATA drives is dependent on a number of factors in the hardware and system disk controllers. While not a disaster, attempting to hot plug the device led to a system lockup and a hard power reset, which in turn led to me rebuilding one of the disks in my operatiing system RAID 1 array. Not a disaster, but hardly a friendly experience, I really would recommend against attempting to hot plug eSATA. Once I got that right, the Dock worked flawlessly, and the eSATA connection was a great deal faster, being able to copy the BKF file created on the laptop to another drive in about fifteen minutes at a rate of about 115 MB/s.
The manual seems clear and nearly unnecessary, if I had to make a suggestion for improvement, it would be to devote a page or two that could point me at to the disk formatting utilities in my OS; it had been a long time since I’d formatted/partitioned a disk. While the Dock will instantly give you a working drive if you plug via USB in a formatted disk, you will (of course!) have to format a brand-new drive.
I’m quite happy with my Dock, for the money it’s an easy way for me to start using bare drives in my backup system, and it’s well worth a look for your own environment.

Alan C
8 Oct 2009The user’s guide is not clear about whether one should insert the drive before supplying power, or supply power and then insert the drive. On removal, the order of steps is very important, but I think it may be very important during initial setup.
Here’s a pointer to the vendor site that has the user manual and flyer. http://www.vantecusa.com/system/application/media/data_file/nst-d100s2_(user_manual).pdf
Excerpt below.
Installation
1. Connect the power adapter to the NexStar Hard Drive Dock.
2. Connect the USB Cable to the NexStar Hard Drive Dock and attach the other end to your computer.
3. Insert 2.5” or 3.5” SATA hard drive (HDD) into the slot.
3-1. When the eject button is upright, the NexStar Hard Drive Dock is ready for use.
Removal
Warning, please push power button & turn off unit before removing the hard drive!
1. Remove the HDD safely from your computer system.
2. Push down the button to eject the HDD. (Stablize the HDD with your hand).
3. Remove the HDD from the Hard Drive Dock.
—
Seems like I should power it up after inserting the drive.