I photograph a lot of events – weddings, tournaments, parties.
One of my least favorite situations is when a photographer comes around to the table where everybody is eating, and wants to take a picture of the people at the table.
I have several problems with this.
- If I have not yet started eating, then my food is getting cold while this happens
- If I have already started eating, I have to stop, wipe my mouth, shuffle chairs, lean awkwardly toward a designated central point, grin, and hope there’s no visible sprout of broccoli stuck between my teeth that will appear in the picture, to the great merriment of everybody who sees it later
- If I have finished eating, then there are dirty dishes in front of me, which is not an attractive setting for a group shot.
As a photographer, I had all the above objections from people I was trying to photograph, as well as the struggle to remain cheerful, and try to get a good shot that records all the people present. There’s also the fact that these shots are usually done with on-camera flash, which is not flattering to anybody.
Ladies and Gentlemen, boys and girls, children of all ages – there is a solution.
I first read about the concept of a photobooth on the Strobist blog – David Hobby had a picture of himself at a booth that had been set up by John Harrington at the Northern Short Course. John had a really elaborate setup (more details here), with Autopoles, umbrellas, multiple computers, and custom software. One of the big features of his “booth” was that he could churn out a print really quickly, so people could walk away with a print of themselves. This was pretty slick – but this ONE function added the second computer, the high speed dye-sub printers, the custom software “¦ so there was a big price jump just for that single feature.
After studying this, I decided I could make it cheaper, without the “instant-print” option. Since most events that I photograph do not require instant prints, I could use the setup, and take the photos back to my studio (it’s really a desk in the corner of a shared office, but it sounds so much better when I call it a “studio”, doesn’t it?) and process the photos.
My first photobooth was at a middle school dance. I was doing photographs for my daughter’s dance, and wanted something that the kids could enjoy, and ham it up a little. It was spectacular. Since I didn’t want to spend hundreds of bucks on Autopoles, I bought two extendable painting poles, and also bought two toilet plungers. (See the basis for the idea here. When you buy these, make sure you tell the checkout clerk that it’s for a second floor bathroom.) By using those as a pressure fit against the ceiling, and a pair of superclamps, I was able to mount a big roll of white seamless paper as a backdrop.

(By the way – did you know that seamless paper will self-unroll, once you get it started? I’ll let you figure out how I know this.)
I set up two lightstands with umbrellas, with speedlights into the umbrellas (that’s what I had at the time), all fired with pocket wizards. I started out with the camera on a tripod, but pretty quickly discarded it – I was tight for space, and the groups were very dynamic, I needed to be faster than constantly adjusting the tripod.
Amazing results. Quick, easy, the kids had fun, and the parents loved the pictures.
Later, I was asked to shoot a wedding, and I’m thinking ahead about the table shots (see above). I pitch the idea to the bride and groom – “photobooth” – show them the pictures of the kids hamming it up – they love it.
The bad news is that the ceiling is 50 feet up (it’s in a large rec center), and I know a bunch of little kids are going to be running around. (See this movie for what I want to avoid.)
So, I have to beef up the backdrop, and beef up the lighting.
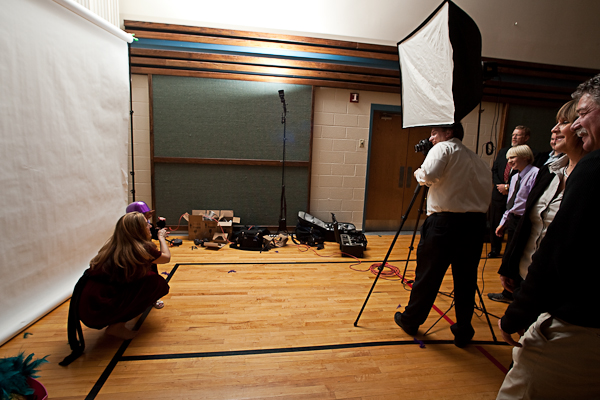
The backdrop support problem is solved with a proper backdrop stand – two stands, and a crossbar that holds both 9 and 12 foot seamless rolls, or fabric. (I tried the fabric, it’s really hard to make it look neat – seamless is definitely the way to go unless you have a LOT of depth for shooting, and can blur it out by controlling your focal depth.)
Swallow hard, click on the “buy” button, and two Alien Bees B800s are on their way to me, along with the large softbox. I’m not sure if I’ll need both Bees for the photobooth, but I definitely want two balanced lights for the formal shots. My hope is that the softbox will be big enough to serve as a single light source above the camera, without looking like “on camera flash”.
I test out the setup in my living room – not the ideal situation, the ceiling is not 50 feet up, but at least I know all the cords and connectors work. I put the camera on a tripod, so that it can be “bang bang bang” without having to compose and focus every time. I put the large softbox on a lightstand above the camera.
It looks like this:
But “¦ I’m thinking. (Always a dangerous thing.)
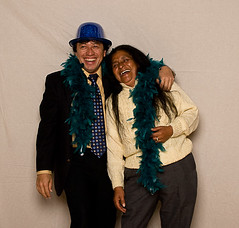
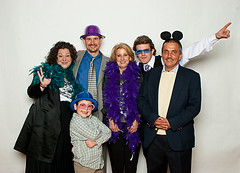
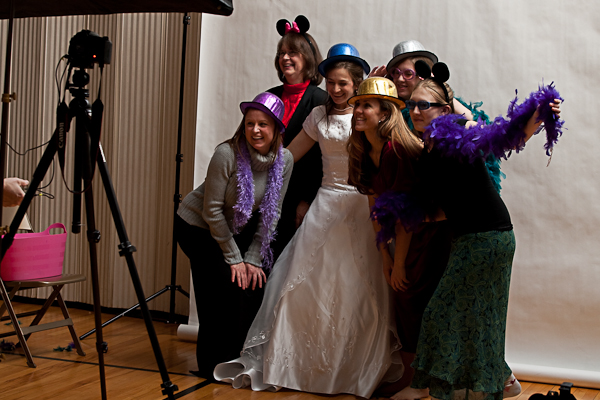
How interesting is it going to be to get adults in front of this? We need to go to 11. I stop by the local party store, and pick up some feather boas, some glitter glasses, and some party hats.
The day arrives. I set up the booth over in a corner, and test it out with myself and the other photographer. Works like a champ. My original idea was to use Pocket Wizards to trigger the camera, so I would be totally wireless, and even have the ability for groups to self-trigger. Unfortunately, something isn’t right, it will fire once, then not fire again. So, I resort to a cable trigger.
This actually works out even better – because it prevents my Pocket Wizards from running away.
Here’s what I did:
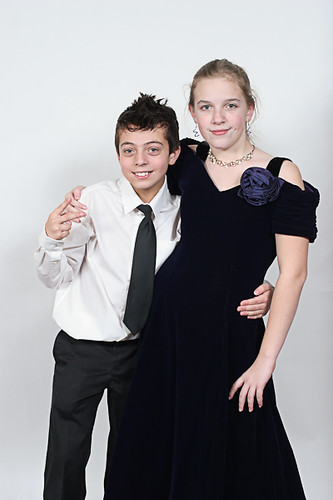
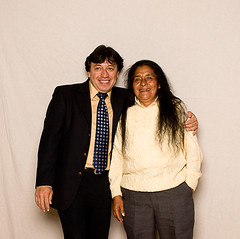
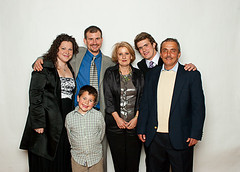
Find a victim guest, and entreat them to come and get their picture taken. It helps if they’re one of the slightly older relatives – aunts of the bride or groom seemed to work best. Put the aunt and uncle in front of the backdrop, get a nice formal picture. They usually get this pinched up “photo face”, go ahead and take the picture anyway.
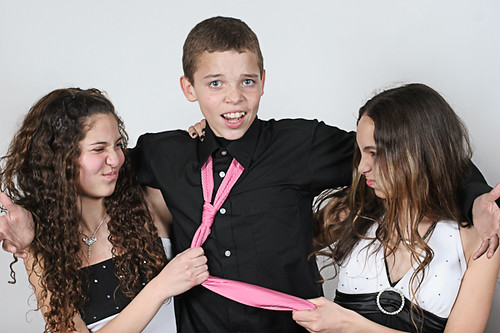
Then, I whip out the basket full of goodies, and say, “Now, one more for ME, ok?” I decorate the two of them with glasses, feather boas, and party hats “¦ usually by this time, they’re all genuine smiles, laughing, some people are gathering around to watch, the second picture is much more fun and interesting than the first.
After I get the second picture, I gently pull the aunt aside, and say, “You know, the bride and groom really want pictures of everybody here “¦ the problem is that I don’t know anybody, so they won’t listen to me when I ask them to come get their picture taken – but they’ll listen to YOU – so, could you help me out, and round up the people for their pictures? I really don’t want the bride and groom disappointed “¦ it is their wedding day”¦” (put on a big hopeful sad-dog expression)
The aunt gets her gumption up, and says, “You’re absolutely right. I’ll make SURE people come over here!” and she marches off, and pretty soon there’s a line of folks ready to party in front of the camera. (Make sure you thank her later!)
From a business standpoint – this is a wonderful add-on to party photography, or wedding photography. You do need a dedicated photographer to run the booth (we have it open right after dinner – before the first dance and cake cutting, and again after the cake). The good news is that it’s REALLY fun – and it’s an excuse to be obnoxious. These stuffy people come and stand in front of you, and you can just put all kinds of ridiculous dress-up things on them, and take their picture! The crowd loves it.
And they do too – because then they recruit the next victim guest and it starts all over again.
Additional tips
- People will want to bring more and more people into the picture – and your backdrop is only 9 feet wide. (Or rather, MY backdrop is only 9 feet wide. A 12 footer won’t fit in the minivan.) At the second event, I taped out a rectangle on the floor using gaffer tape, and said, “You can put all the people you want in the picture, but they have to fit inside the rectangle.” That made it self-regulating.
- I recommend using a 50 mm lens or larger – this will prevent problems with the people on the outside getting squished around by the lens distortion. If you don’t have enough depth, then do what you can – but keep in mind not to go too wide, or it will look funny. More depth will also allow more people to fit on a given backdrop (since you are farther back, your angle of view is smaller to include the entire seamless, but the AREA for the subjects is wider.)
Equipment list
- backdrop kit – two stands and a crossbar (I have this one)
- White seamless
- AB800
- Large softbox
- Camera
- Tripod
- Lightstand
- Trigger cable
Great fun.

Booray Perry
15 Apr 2009I’ve been considering this sort of thing myself so let me ask you: How do you price it out? There are several ways to do it and I can’t figure the best one. Do you charge a straight extra fee and include the images with the wedding images… do you charge no extra fee and sell the images online (not part of the clients package)… I read one guy who keeps the images and sells only digital prints online at a crazy low price. What’s your solution?
Bill Millios
15 Apr 2009I usually price it as an add-on to the wedding, and include the images in the online gallery.
In all honesty, however, it really doesn’t cost anything extra, and in fact solves several other problems. You’re going to be spending time taking pictures of people at the tables during that time anyway – and this gives you better results.
I would struggle to do this if I was alone shooting a wedding – because you do need a dedicated photographer for the booth. I would worry about missing something going on outside of the booth. We only had it open for parts of the evening … so theoretically if you’re a quick runner, you could do the whole thing alone.
For a party, like a school dance, if you can get someone to pay for the booth, then sell the prints, you can sell the prints for less. If you have to do the whole thing on spec, and make your money selling prints, then obviously the print prices are going to be higher.
John Harrington wrote that if he was going to set up HIS booth, and give away the instant prints, he’d charge $2500 for the evening – but that would include giving away the prints, and he’d have an assistant running the thing.
brett maxwell
20 May 2009I’ve done a similar photobooth a couple times, and I was fortunate enough to have a large flat-screen TV on the wall next to where I was doing it. I plugged the video feed from my camera into that so people could instantly see their shot. I did it one time without this and I learned that having it made it much more entertaining for both the people in the shots and other guests watching. It also made it so there was a constant line. I haven’t decided how I will offer this when the venue doesn’t have a screen nearby, but I will either be buying a projector, a TV, or at minimum a 9″ portable DVD player.
Doug
15 Jul 2010Great article. think I will try this. Really need to find dye sub printer, thats not going to break the bank 🙂
Autumn
29 Nov 2010Hi Hi,
Any kind soul can lead me to the the correct route to get the instant photobooth software?
I am thinking to set up a small biz : )
intaG
7 Jun 2013Thank you so much for helpful article. I was looking for ways to set up photobooth for my events. Hmmm would tethering to LR work for live view?