In my last post, I described a basic workflow for using Lightroom to produce black and white images from color originals. In general, the process is simple and problem-free, but there are two specific areas where problems have arisen and suggest some strategies for working with them.
The first problem is easy enough to explain, if you have a smooth gradient from one hue to another, such as the pink-to-purple-to-blue transition of an earth shadow, you may need to exercise restraint and caution with the Grayscale Mix controls. It’s fairly easy, particularly if you use large or very differing adjustment values for the different hues in the gradient, to end up with unnatural looking results. In most cases, this is easy to fix, once you actually notice it, by careful adjustment of the sliders, but occasionally it won’t be, and you’ll have to resort to other techniques (perhaps the gradient filter tool, or working the image with other tools in Photoshop) to realize your vision.
The second problem is noise. Sometimes strong adjustments to the Grayscale Mix sliders will really bring out noise in an image, I often run into this when darkening skies. Noise reduction can help here, but, there’s a catch…
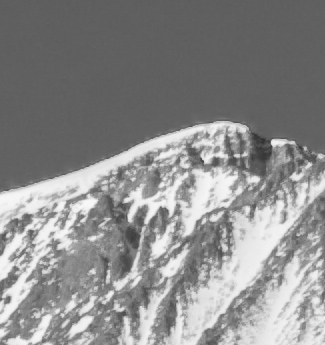
A third problem is trickier, a longstanding issue in black and white conversions in Lightroom, as well as Adobe Camera Raw, is a set of artifacts that often crop up along edges of images you’d applied strong Grayscale Mix adjustment effects. Below, I’ve included a 100% crop of a detail along the top of the mountain from the example in my previous post.
If you look carefully along the horizon, you’ll notice a stairstep like artifact of whitish areas moving into the dark sky. These are not, as they might first appear, JPEG compression artifacts. Instead I’ve come to believe that they’re an artifact of the numerous image processing steps Lightroom is undertaking in an image, in this case, perhaps a combination not only of the Grayscale conversion but also noise reduction and perhaps sharpening. I’ve encountered these artifacts most often in working with images like this one, where I’ve made strong Grayscale mix adjustments, along the boundary between a darkened sky and ground.
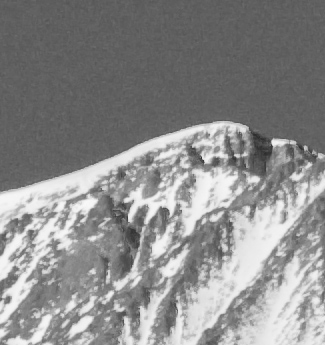
The core culprit, unfortunately, appears to be color noise reduction. When I turn off color noise reduction on the same crop of the same image, and leave all the other settings intact,
As you can see, there are two significant differences between the images, first, the stairsteps are gone, second, we’ve picked up a noticeable amount of noise in the sky. There isn’t much red/green data in the blue sky, and once we’ve eliminated the blue component, we end up with a lot of noise. The use of strong Grayscale Mix adjustments makes that even worse. Add to that a need to eliminate color noise reduction, and even in an ISO 100 image from a modern DSLR like the Canon EOS 1Ds Mark III, and you get some tolerable but surprisingly large noise.
None of this is the end of the world, save for larger prints many of this artifacts are going to be minimal once they’ve “hit the paper.” Still, It’s my hope that future versions of Adobe’s raw processing engine will be better able to handle this situation.
In the meantime, keep an eye out for artifacts like this near strong edges, and when any artifacts make themselves appear, look at reducing the amount of noise reduction you use in the image (while keeping an eye on grain), it’s almost always possible to get a good result this way.


Michael W. Gray
5 May 2009Great post! I develop film emulation presets and I have noticed the same thing in many images. It some times will also appear as a halo-like effect in high contrast areas, almost like a border. Color NR drastically fades that effect as well.
Ranger 9
7 May 2009If you look carefully at the two example images, you can see that in the second one the edge artifact is still there — it’s just less obvious because of all the noise in the sky area next to it.
This is happening because photographic images generally consist of statistically distributed ranges of pixel values, rather than mathematically ideal regions of constant or smoothly changing pixel values. In an idealized, smoothly gradated image (such as one you might create with illustration software) pixels which are close together will have similar values. In real-life photography, any two pixels that are arbitrarily close together may have drastically different values.
When you apply mathematical transformations to a specific range of pixel values without affecting others — which is what the grayscale-mix adjustments do — you can easily shift those values far enough to create an unnatural-looking relationship to the values of pixels near them. (This is why Photoshop retouchers have to use the “Add Noise” filter to put variation back into areas on which they’ve painted heavily.)
The practice of applying transformations to some pixel values but not others is also the underlying cause of the other two problems you mention, as well as many other artifacts that crop up in image manipulation. The more selective you try to be about altering pixel values in your images, the greater the risk that the altered pixels will no longer have a realistic relationship to others nearby.
Joe Decker
7 May 2009Michael: Indeed, I’ve seen the extra halo, too. I’ll take a look at your presets, those sound like fun.
Ranger: I think you might be right that there is still a bit of an edge artifact there, although it’s quite subtle compared to the one on top. I’m a little surprised by this, but I suspect it’s a little sharpening built into the Bayer-pattern deconvolution of the pixel data. As I’m sure you know, digital camera sensors (and I’m leaving out Foveon sensors here) only pick up a red, green or blue value at each location, the other primaries for each location are computed using an interpolation function, essentially by smoothing, which tends to blur the chroma values of the resulting image, it would not surprise me if a pinch of sharpening was implicit or explicit in this part of the calculation in Lightroom.
While I agree with you that the yanking around of pixel values quote-unnaturally-unquote is part of what’s triggering the stairstep artifact, it is my guess that there is arguably a bug there as well. Lightroom has an incredibly difficult job in image processing, Bayer-pattern deconvolution, sharpening, tonal adjustments/grayscale adjustments and noise reduction all have to be performed on some images and as with any sort of digital image processing, the correct order of operations is essential for best results. If noise reduction were the last step, it’d be pretty much ridiculous to look at the “no noise reduction” and to suggest that “noise reduction” would produce the artifacts shown above.
While it might be that a different internal order of operations would resolve this, I think from other experiments that the problem is actually a bug, for a variety of reasons (different results for situatons which are more or less mirror images of each other, size of stairsteps being more than one pixel in any dimension, etc.)
(Of course, I don’t know of another raw converter that offers all this functionality to demonstrate the differences on. So it goes!)
Denise
18 May 2009I’m really glad I finally got to read these articles. They’re already helping. I’ll be careful to look for the stairste effect now. Thanks!